You are backing up your last physical servers using the latest Veeam Agent 2.0. You are storing backups offsite in the cloud using Veeam Cloud Connect to your favorite service provider….
The disaster strikes. Your server vanishes in a puff of smoke. You need to restore, restore quickly. But how?
You know your data is safe in the cloud, but how to get it back?
Your server is toast, you want to restore, sure you can build replacement hardware, if you are lucky you will have spares, or you can use this as an opportunity to virtualize the platform
Info to know before you start:
- Approx specs of recovery VM
- The number and size of attached disk
- Whether physical machine had UEFI bios or not.
Disclaimer: At this point it needs to be noted that if you are recovering a whole VM into a Virtual Environment, then if you are backing up a VM in the first place, then you should be using Veeam B&R and not the agent. However if you are just using the agent to backup a bare metal server then this method is for you when recovering onto a Virtual Platform. However due to the nature of different drivers and motherboard options then this cannot be guaranteed to work in all situations. YMMV. Remember that testing restore processes is just as important as handing backups in the first place
Best practice would say that you have a restore image somewhere, that it is up to date (you don’t need to take regular copies, just after major OS or hardware changes). But experience says that when disaster strikes you tend to find that you don’t have all the data you were hoping for….
- You have the bare metal iso recovery image you created for your server. Good that’s a start.
- You don’t have the bare metal iso recovery either you didn’t create it, or you lost it along with your server.. Good news is that you can create a ‘generic’ one. Create a VM, Boot from windows media iso. Doesn’t really matter which, but preferable the same version that you are trying to restore, and do a basic install. Configure DCHP on network interface, don’t need to activate windows. Install Veeam backup agent, and run the media creation wizard. Create new ISO and use this for your recovery.
Step 1: Upload the recovery iso to a vmware datastore
Step 2: Create a VM with similar specs to what you need to restore.
Attach the iso to the CD/DVD and select “Connect at Power On”.
Also needs to be on a network that has access to the cloud connect repo. The recovery image needs to be able to connect to the Internet. The exact setup here would depend on your network and what’s expected in the recovery iso. However you can edit that later. I have a ‘recovery vlan’, where DHCP is available and outbound internet access is available, but still secured.
Virtual Disks should be created to be able to restore the image in.
If the hardware you are restoring from has UEFI bios then you should select this under the “VM Boot” options, rather than the default BIOS.
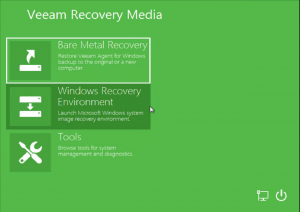
Step 3: Power On….
The Windows RE image from ISO should boot. (Note the example here is recovering an old WIndows 2008 R2 server. Minimum requirements for Running Veeam Agent 2.0 are Win2008R2 with SP1.
Step 4: Once booted, select Bare Metal Recovery
We are going to recover from “Network Storage” and that network storage is a “Veeam Cloud Connect repository”
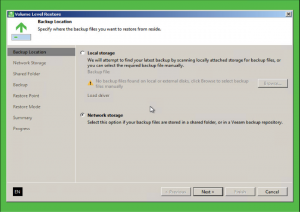
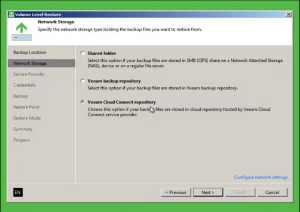
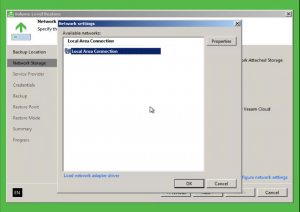
At this point, if the original server had statically configured IP address or multiple network connection – then you might need to “Configure Network Settings“. Set whatever settings you need to get the server up and connected to the Cloud Connect repository.
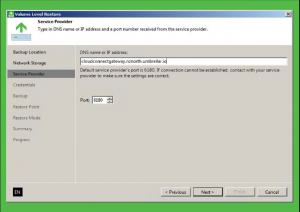
Step 5: Enter your Cloud Connect repository credentials, and select the recovery point to restore
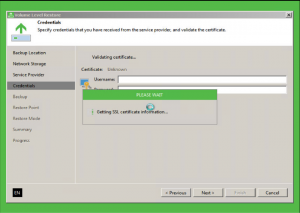
Once SSL is validated, enter your credentials and then you should be able to see your backup jobs
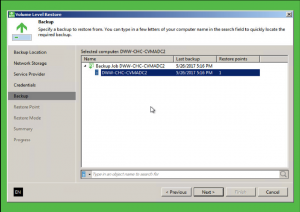
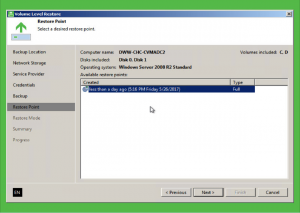
Excellent we have our restore point
Note Warning. (also if you are using a generic restore ISO, then you may also get a warning “OS version in backup is different from current OS. This may cause driver installation issues.” If it does cause issue then you can create a ISO with same OS as you are trying to recover. I did not have problems with restoring a 2008R2 image from a generic ISO created with 2012)
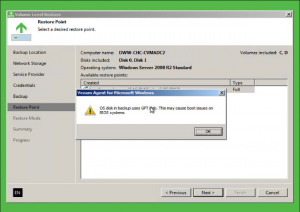
If you see the following message “OS disk in backup uses GPT disk. This may cause boot issues on BIOS systems.” Don’t worry (this was circa 2009 hardware (IBM SystemX 3550M2), but even then it was all UEFI based. Ack that (we’ll switch the settings before we reboot into restored OS, you should not switch between BIOS and UEFI after the OS is installed. Bad things can happen)
https://communities.vmware.com/docs/DOC-28494
Step 6: Select Restore the entire computer
Look at the disk mapping
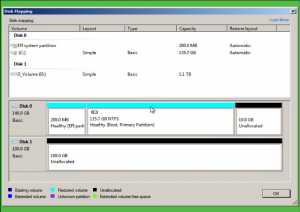
You can see that the 1TB D: drive isn’t going to map/fit. In this case never mind. I didn’t need that scratch drive anyway. But it speaks to the point in Step 1 that you need disks to be able to restore into. If you do need the data, and you didn’t create enough or large enough drives at the start. Simply power off the VM, change the settings reboot and loop back to Step 3.
If the “Entire Computer” option doesn’t work, because it cannot auto match the disks, then you will need to go into Manual Mode and select the disks.
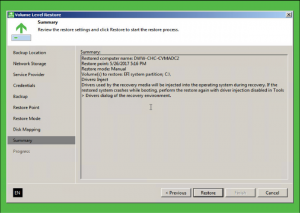
Once done you should be the summary page, and then if you are happy with the summary, select “Restore”

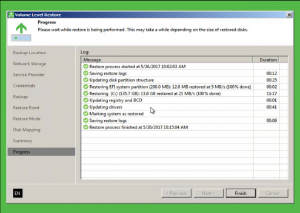
This may take some time, depending on the size of the restore and the network speed to the repository. Time for a cup of coffee.
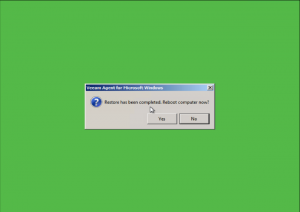
And just to show that the restored image did boot up….
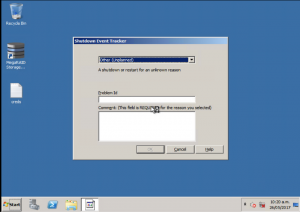
Of course, now you have restored onto different hardware, there may be some reconfiguration and driver work to do.